Deep Dive in using Dataverse Lookup Columns
- Shane Young

- Feb 17, 2025
- 3 min read
Updated: Feb 19
Dataverse lookup columns are essential for managing relationships between tables in Power Apps. Whether you're building a Canvas App or integrating with Power Automate, understanding how lookups work can help you create more efficient and scalable applications. This post will walk you through everything you need to know about using lookup columns in Dataverse.
If you're more of a visual learner, you can check out everything covered here (and more) in the YouTube video: Deep Dive in Using Dataverse Lookup Columns
What Are Dataverse Lookup Columns?
A lookup column in Dataverse creates a relationship between two tables. Instead of storing plain text or numbers, it stores a reference to a record in another table. This is useful when you need to maintain data integrity and avoid duplication.
For example, in an Employees table, you might want to link each employee to a Region. Instead of storing region names as plain text, you can create a lookup column that connects to a Regions table. This ensures consistency and allows you to easily pull in related information such as a region code, manager, or goal.
Tip: When creating the table, you'll look up against (like Regions in this example), take extra care when choosing your Primary Column. This text column will be the default in lookups and is often the only column you can display.


Creating a Lookup Column in Dataverse
To set up a lookup column:
Navigate to Tables in Dataverse and open the table where you want to add the lookup. For our example, this is the Employees table.
Click Add Column and choose Lookup as the data type.
Select the related table (the Regions table in this example).
Save the column and verify that the relationship has been created.

Using Lookup Columns in a Canvas App
Once you've created the lookup, you can use it inside a Power Apps Canvas App. Here are a few common scenarios:
1. Displaying Lookup Data in a Gallery
If you add a Gallery control to show employees, you can display related region names using:
ThisItem.WorkRegion.RegionNameThisItem.WorkRegion is the full record of the item you're looking up. This means that instead of just .RegionName, you could reference .RegionManager, .Goal, or any other column from the record. This is called a polymorphic lookup and is a great feature of Dataverse lookup columns.

2. Filtering by Lookup Column
To filter employees by a specific region:
Filter(Employees, WorkRegion.RegionCode = "EU")Since the lookup column stores an entire record, you must specify the field you want to filter on (for example, RegionCode).

3. Saving Data with a Form
If you use a Form Control, the lookup column will automatically show a dropdown with related records, making it easy to select values. Nothing special to do here.

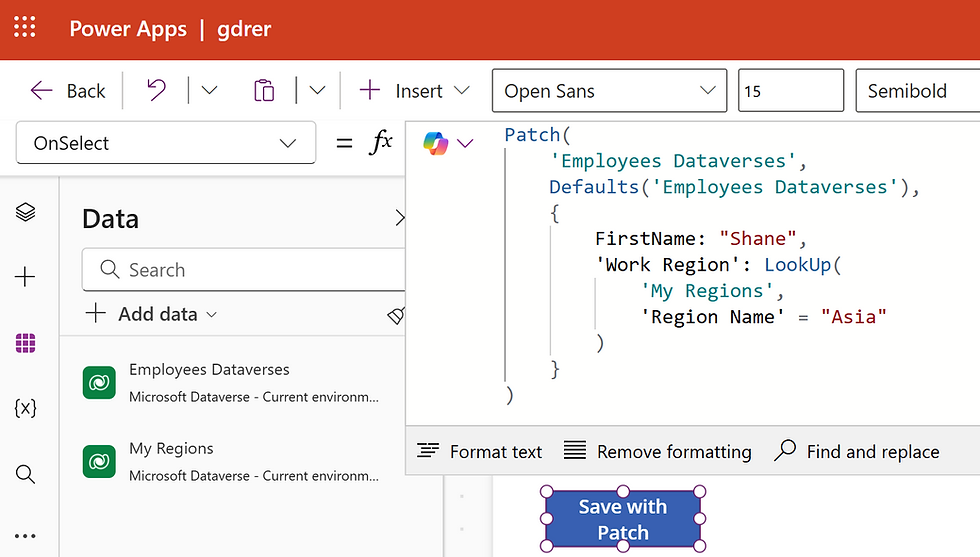
4. Patching a Lookup Field
If you prefer using Patch instead of forms, you need to provide a record when updating a lookup column:
Patch(Employees, Defaults(Employees),
{
FirstName: "John",
WorkRegion: LookUp(Regions, RegionName = "North America")
})
In that example, we used RegionName as the text to look up. Often, you'll want to use something you know will always be unique (like the GUID primary ID column). It doesn't matter, as long as LookUp returns a matching record.
Using Lookup Columns in Power Automate
When working with lookup columns in Power Automate, you might need to use OData queries to filter or retrieve data. The lookup column’s system name often follows this format:
_cr662workregion_value eq 'GUID'For example, to filter employees by region in a List Rows action:
_cr662workregion_value eq '2a6ddb65-cfeb-ef11-be21-6045bdedb9f2'In the video, we went into detail about how to find these exact values for your tables. If you're struggling, check out the video for a walkthrough.
You can also expand related data using the `$expand` parameter.

Relationship Behaviors and Cascading Actions
Dataverse lets you define how relationships behave when a parent record is deleted. The most common options include:
Referential: Deleting a parent does not affect child records.
Restrict Delete: Prevents deletion if related child records exist.
Cascade Delete: Deleting a parent removes all related child records.

Wrapping Up
Dataverse lookup columns are a powerful tool for creating structured relationships between tables. Whether you're displaying data in Power Apps, filtering records, or integrating with Power Automate, understanding how lookups work will help you build more robust applications.
If you have any questions or want to learn more, click the Contact button—we're happy to help! We have consulting and training options to assist you with this or any other challenges you might have.


Comments